Google Analytics
StockNotify App can be setup to use gtag for Conversion tracking using Google Analytics Event.
When shopper uses the email links from the notification email, it will create an “StockNotify_Email” Google Analytics event and store tracking details in the cookie. If the shopper makes a purchase within 7 days (customisable), using the same browser then a Google Analytics “StockNotify_Conversion” event will be created to track number of conversions and basket value.
If you need any assistance with the follow configuration or simply want us to do it for you, please email support or raise a support ticket. We will need access to your GA and BigCommerce Control Panel account.
Set up in Google Analytics
First, if you don’t already have a GA account you will need to register and create one. Follow the instruction from Google to create an account.
Make a note of your “G-” Measurement Id/Tracking ID . You can find instruction on how to get your Tracking ID at the bottom of the page from the link above. (You will need to later on BigCommerce and App setup)
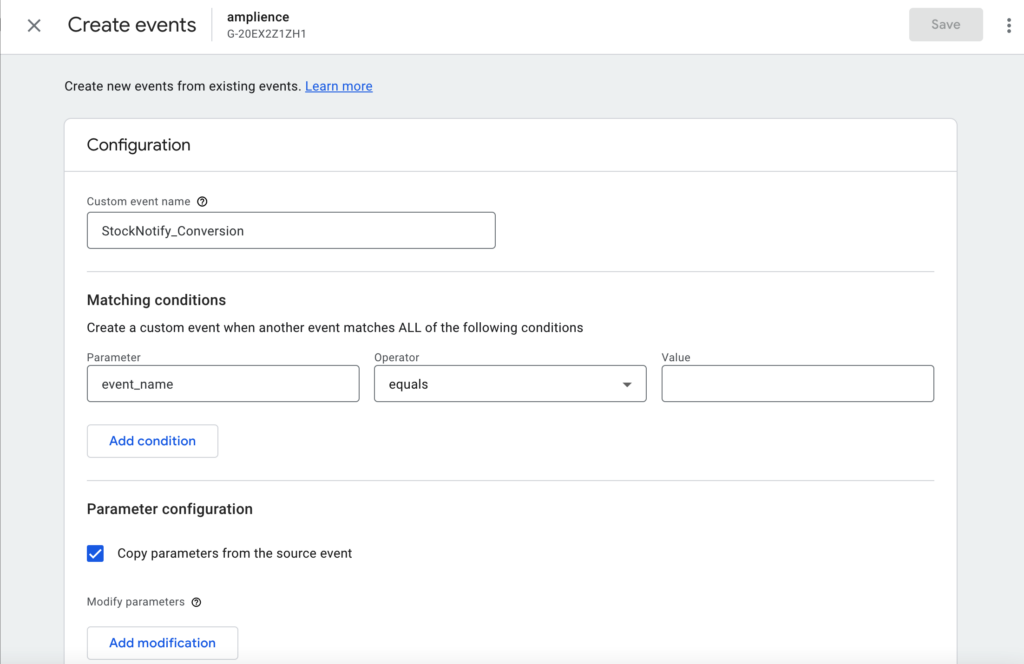
Then in Google Analytics go to Configure-> Account Settings -> Events and create a new “StockNotify_Conversion” Event.
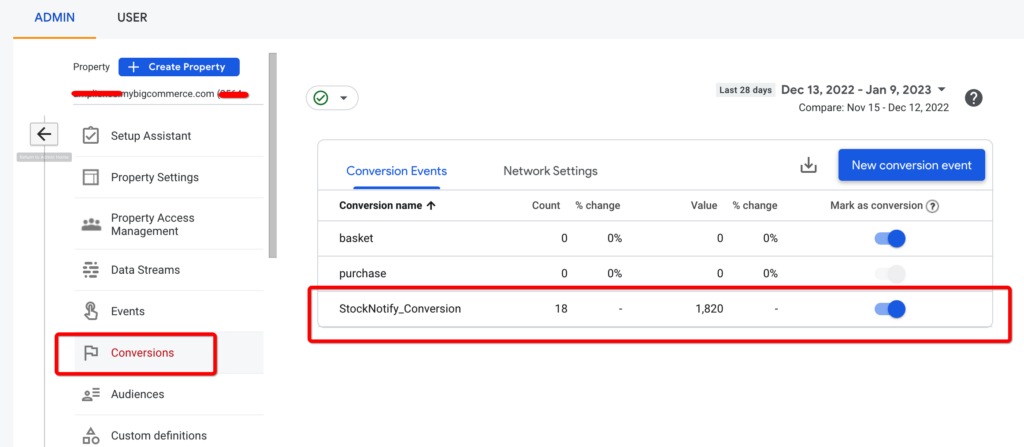
Finally in Google Analytics update the “StockNotify_Conversion” event to be “Mark as conversion”. You can do this from Configuration-> Account Settings -> Conversions
Setup in BigCommerce and StockNotify App
Login to BigCommerce Control Panel and create a new Script in Script Manager. Use the instruction below from BigCommerce on how to use Script Manage.
https://support.bigcommerce.com/s/article/Using-Script-Manager?language=en_US
The Script need to be located on “Head”,
and added to “All pages”, and it is Analytics category.
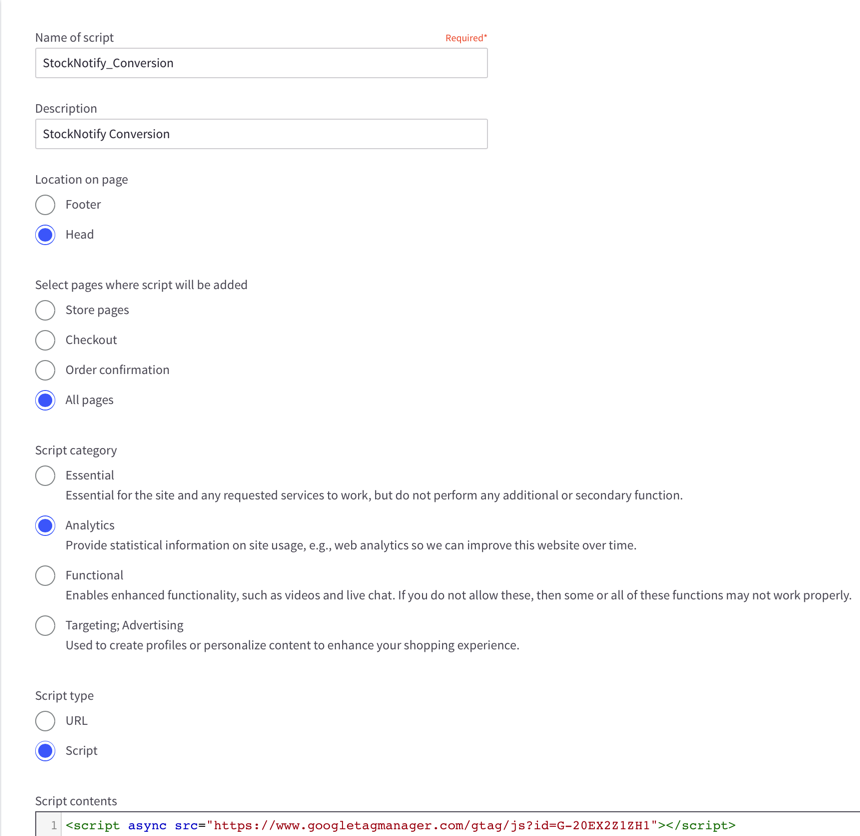
Copy the Script below into the “Script Contents” Textarea. Makesure you replace the GA Tracking ID on the 2 location highlighted (in red) with your own Tracking ID.
<script async src="https://www.googletagmanager.com/gtag/js?id=G-20EX2Z1ZH1"></script>
<script id="StockNotify_Conversion_Variables">
window.dataLayer = window.dataLayer || [];
function gtag(){window.dataLayer.push(arguments);}
gtag('js', new Date());
gtag('config', 'G-20EX2Z1ZH1');
let bcsn_tracking_days = 7;
let bcsn_source_param_name = "bcsn_source";
let bcsn_source_name = "StockNotify_Email";
let bcsn_conversion_name = "StockNotify_Conversion";
let bcsn_duration = bcsn_tracking_days*24*60*60*1000;
</script>
<script id="StockNotify_Conversion">
bcsn_urlParam=function(e){var n=new RegExp("[?&]"+e+"=([^&#]*)").exec(window.location.search);return null!==n&&(n[1]||0)};let bcsn_source=bcsn_urlParam(bcsn_source_param_name);if(bcsn_source&&bcsn_source==bcsn_source_name){let e={source:bcsn_source,timestamp:Date.now()};gtag("event",bcsn_source,{event_url:window.location.href}),localStorage.setItem(bcsn_source_name,JSON.stringify(e))}function bcsn_conversion(){var e=$("body").find('*[data-test="order-confirmation-order-number-text"]').children().children().html();let n=localStorage.getItem(bcsn_source_name);n=JSON.parse(n),e&&n&&fetch("/api/storefront/orders/"+e,{method:"GET",credentials:"include",mode:"cors",headers:{"Content-Type":"application/json"}}).catch((function(){})).then((e=>e.json())).then((e=>{if(e&&e.orderId){let o=e.orderId,r=e.orderAmount,t=e.currency.code;n.timestamp&&Date.now()-n.timestamp<=bcsn_duration?(gtag("event",bcsn_conversion_name,{source:n.source,timestamp:new Date(n.timestamp).toUTCString(),currency:t,value:r,orderId:o}),localStorage.removeItem(bcsn_source_name)):localStorage.removeItem(bcsn_source_name)}})).catch((function(){}))}$(document).ready((function(){window.location.href.indexOf("order-confirmation")>0&&setTimeout((function(){bcsn_conversion()}),1e3)}));
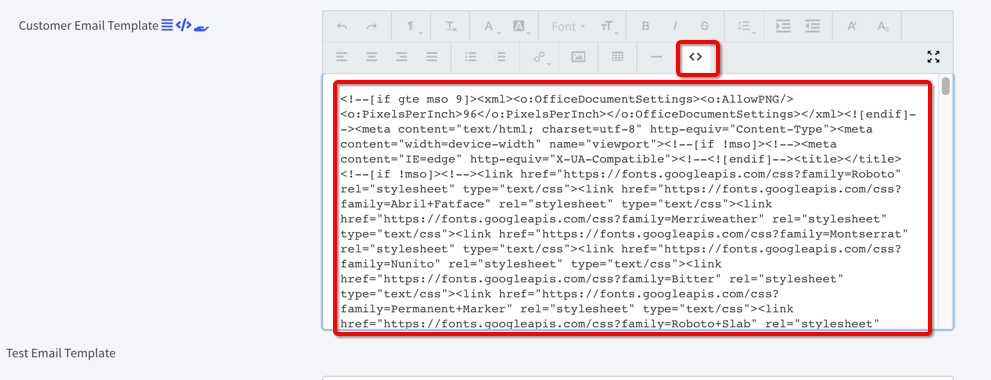
</script>Finally check that you have added the event to the “Call to Action” links on your email template. Go to the StockNotify App’s Settings page and update the email template in HTML View.
Search for {{custom_url.url}} and add ?bcsn_source=StockNotify_Email immediate after it. If you are using the standard email template there are 2 locations. For Example:
<a href="{{site.url}}{{custom_url.url}}?bcsn_source=StockNotify_Email" style= ...